All Categories > Setup your Timetac account > How to create a work schedule
How to create a work schedule
This article explains how to create a work schedule and assign it to an employee.
This article is intended for Managers and Admins.
Creating a new Work Schedule
1Open the Settings menu.
2Navigate to the Work Schedules section.
3Click the Add Work Schedule button.
4A dialog will open. Enter a name for your work time model.
Choose a template:
Target hour scheduleA fixed working time model with daily target hours that remain constant each week.
Minijobber (weekly hours)
For employees who only work a set amount of hours per week
Minijobber (monthly hours)
For employees who only work a set amount of hours per month
No target hours
No fixed working days, without target hours per day or month. Working hours are shown as a balance.

5Click Create.
6Now, you can set up your work time model.
Click on the three-dot menu to edit the work time model:
Click on the three-dot menu to edit the work time model:

Key Settings:
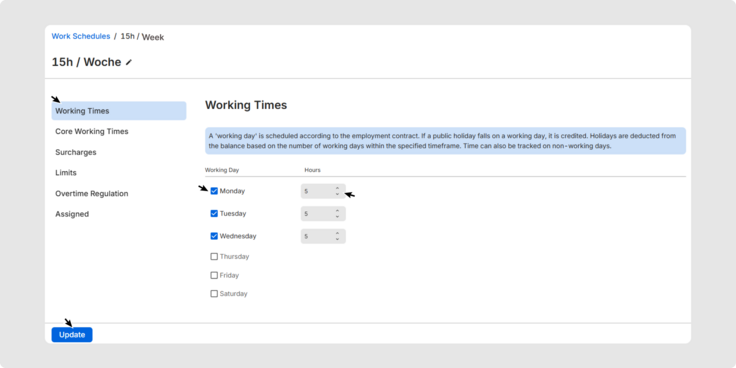
1. Configure Working Times
Define which days are worked by activating the checkboxes for the weekdays.
- Set the hours that need to be tracked as target hours for each day in TimeTac.
- Confirm your entries by clicking Update.

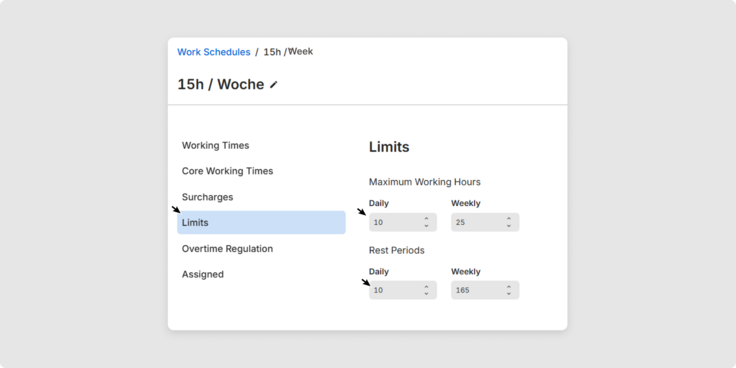
2. Limits
Here, you can define the maximum working hours and rest periods.
- Set the daily and weekly maximum working hours.
- Set the daily and weekly rest periods.
- Confirm your settings by clicking Update.

Info: If the maximum working hours or rest periods are exceeded, a warning will be triggered in the system.
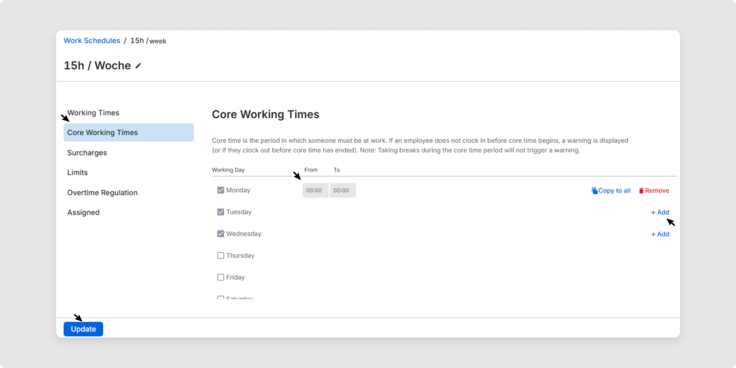
3. Core Working Times
The workdays are already marked because they were set in the work schedule. You can also define the specific times for the core working hours, i.e., the start and end times.
- Click + Add and enter the start and end times.

Info: If the core working hours are not adhered to, a warning will also be triggered.
- Click Update to save your settings.
Note: Changes to existing working time models (e.g. target hours or working days) are possible, but they apply retroactively to recorded times — starting from the date the model became valid for the respective user.
Assigning a Work Schedule to an Employee
1Go to the People menu.
2In the user overview, you will see which employees do not have a work time model assigned. Select the employee you want to assign this work time model to.
3Click Assign in the column Work Schedule to directly access the employee’s profile.
4Define the basic data for the work schedule:

- Employment Start Date: Enter the employee's start date.
- Assigned Work Schedules: Select the work schedule for the employee from the drop-down menu.
- Work Schedule Start Date: Enter the date from which this work schedule should be valid for the employee.

5Go to the end of the form and click Update Profile.
Assign a Work Schedule to Multiple Employees
1Go to the Settings menu.
2Under Work Schedules, select the desired schedule and click the three dots on the right.
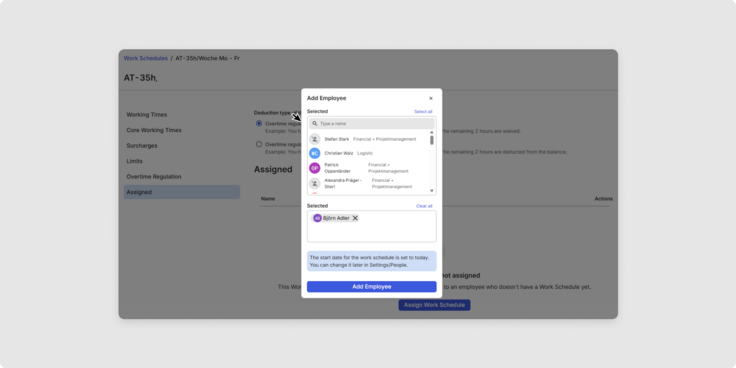
3In the Assigned section, under Assign Work Schedule, you can assign a schedule to multiple employees.
4A window will open – click on the employees’ names or enter them in the search field to select them for this schedule.
5Confirm your selection by clicking Add Employees.

You have now learned how to set up and manage work schedules, including working days, hours, and employee assignments.
Was this Article useful for you?
Yes, this was useful
No, this was not useful
